
This article is a sequel to Turning a Trap - Prologue. It is recommended to read the prologue first in order to understand the nature and the context of this article. Todays part covers the battle from ship deployment to right before the start of the ship phase of the second game round.
"We are supposed not jump with the rest of the fleet, Sir?", the incredulous voice of the captain sounded from the comms mudule . "In deed, captain! Jump the Chimaera to a point in safe
distance of the nebula gate", Thrawn explained patiently a second time.
"But, Sir...", the officer tried to reply.
"Captian! We want to know where and how the enemy fleet is located, before we field our flagship, don't we?", Thrawn interrupted, this time with a not so patient voice.
"Hence, I have sent the quasar as a Vanguard with the two decimators. And hence, the Chimaera will enter the battle field by a second hyperspace jump after we have proper intelligence of the situation. Is this understood, captain?"
"Yes, Sir!", the captain replied, this time without hesitation. Thrawn knew how dangerous a pack of hammerhead corvettes could be even for an imperial star destroyer, if they managed to approach the bigger ship idealy. It was not his plan to give them the opportunity.
Again he turned to the space hologram of the Nebula Gate. Again and again he considered the vectors of the squadrons and the ideal dog fight locations. He logged the simulation into the coordination framework of the Chimaera. He knew that the squadron fights of this battle would be decisive - supposed Solo's trap was not more dangerous than expected.
My opponent Visovics decided to deploy one quasar (and later 2 decimator squadrons) first in the center of his deployment zone right across the Nebula Gate. Because he had way mor squadrons for the initial deployment than me (22 to 12) he was more than able to even out my higher number of ships and thereby delaying the deployment of the Chimaera to a point where I had already deployed a major part of my fleet.
"There they are! Merely one star destroyer!", Hera's voice sounded from the speaker. Han laughed in relief and replied:
"And you have been right, General Syndulla. Maneuvering our units offside the Nebula Gate resulted in deed in a scattered imperial fleet. At least the quasar is nothing we need to worry about soon. Congratulations!"
Everything seemed to go according to the plan. But then Chewie howeld.
"What? Another star destroyer is approaching from hyperspace? What? It wasn't part of the fleet? Damn!"
Han called the Ghost again.
"Already seen, General Solo", Hera's voice sounded, "that is Thrawn's flagship, the Chimaera."
"Yes, directly heading to the Phonix Home and the Yavaris!", Han replied.
"What...Chewie? That still isn't all? Another fleet is approaching?", Han shouted as the Wookie continued to howl. Again the comms module established a link to the Ghost:
"General Solo, the approaching second fleet contains at least a third star destroyer. We need to stick to our plan. Now it is in your hands. May the force be with you!"
"Yes, Chewie", Han yelled hastily as the comms module went silent, "I have a bad feeling as well."
He looked at the hammerhead corvettes. The falcon was in some distance of the other squadrons - right at the other end of the rebel fleet. On his own he was supposed to circumvent the enemy squadrons and hot wire the enemy hyperspace entry points. Would his plan succeed to divert the attention of the enemy squadrons from the Falcon due to the swarms of X-Wings on the other side of the fleet?
The basic idea of my deployment was to get my fleet as far as possible from the center and therby from the enemy hyperspace tokens. Because of my four wider distributed hyperspace points I could still attack the rear of the opposing fleet, whereas Vicovics' could merely with one exception deploy his reinforcements far from the main battle. And this one hyperspace token I wanted to move as far from my fleet as possible with the Falcon.
It went nicely for me that the quasar (the very first deployment of the game) was deployed in the center. Because I deployed as far to the left as possible (first the Yavaris, then all my Squads except of the Falcon and the Ghost) I could lure Visovics in deploying his remaining units more to the left as well - which resulted in his quasar to be far from the battle. Both star destroyers of his main fleet had been deployed on the far left as well - especially the Chimaera, which was thanks to this in safe distance from my hyperspace points and thereby from my Mon Calamari big cannons.
The following image shows the state of the game after deployment (click to enlarge):

Thrawn knew that his positioning was not ideal. The quasar was to far from the battle - and the enemy reinforcements could arrive directly in their rear.
"Grand admiral, four enemy ships are approaching from hyperspace", his first officer reported.
Four ships. Even the strongest ships the rebels commanded at the moment were merely assault frigates mark II. Even four of them could pose no threat to his fleet - even if they arrived in their rear.
"Bring in the quasar as fast as possible. All other units approach the enemy slowly; all other ships - apart from the Chimaera! Full speed to the Phoenix Home, captain!", Thrawn commanded.
"But, Sir!", the captain spluttered.
"Catpain, proceed as commanded!", Thrawn hissed, "or do you want the Chimaere being ripped apart by those hammerhead corvettes?"
"Aye, aye, Sir!", the captain replied.
During the first round nothing spectacular happened for some time. All ships were slowly approaching each other. The hammerheads turned a bit in order to get into close combat with the star destroyers. Suprisingly, the Chimaera charged with speed 3 - what made possible that she circumvented the hammerhead attacks completelly. After all imperial ships had been moved, I still had 3 ships to activate - which allowed me to pull off the following:
"General Solo, here is Captain Tallon fron the Phoenix Home. It is time for your mission!", it sounded from the Falcon's speakers.
"Go, Chewie!", Han yelled. They were forced into their seats as a loud drumming noise sounded and the engines of the Falcon went to maximum power. Chewie giggled, which sounded like a cackle, as they left the hammerhead corvettes behind.
"Now!"
Following the command, Chewie rose and skeltered to the cargo area in order to activate the hot wiring device.
"General Solo, Yavaris here. It works! But this is still not far enough from our fleet!"
Han turned the Falcon a bit, but did not decrease speed. Chewie roared from the cargo area.
"Done? Great!", Han replied. He murmered to himself: "Let's find some cover behind these asteroids over there."
Via a squadron command first the Phonix Home activated the Falcon. Han moved the hyperspace token of the imperial fleet for the first time. Adar Tallon toggled the activation slider back.
Now, Yavaris activated the Falcon a second time in order to move the token even further away - see the picture to the right (click to enlarge).
After that, during the first activations of the squadron phase not much happened - until the following scene took place:
"Wedge, this is the Ghost. I think Saber Squadron is approaching. Its trajectory seems to imply that they want to hunt down the Moldy Crow. We cannot accept losing our intelligence computers there. Try to intercept!"
"Aye, Sir, we will deal with them", Wedge replied. Intercepting an enemy squadron on its way to work - probably no one in the entire Galaxy was experienced as Wedge for such a job .
"Red Squadron, follow me!", he commanded as trained so often before. He brought his squadron relative to the approaching Tie interceptors to a high ground. Now they were right between Saber Squadron and the Yavaris and therefor more difficult to spot. Wedge detected the red ribbon on the Ties. It really was Saber Squadron!
"Now!", he shouted in the comms module. His squadron increased speed, turned a bit und started to fire by simulatneously approaching Saber Squadron from above. Half a looping and Wedge was right behind the enemy squadron leader. With a bright explosion the Tie in front of him was gone for good. Merely a few seconds had passed and the entire Saber Squadron was annihilated.
"All to easy!", Wedge laughed.
"Red leader, I am hi...aaargh", he heared from the comms module. Wedge turned his head. A YV-666 transport approached them and had started to fire. Bossk - that headhunter scum!
After my opponent moved Saber Squadron close to my squadrons during the squadron phase, I was able to activate Wedge. Due to the Ghost he had the 'rogue' keyword. Hence, he could move and fire. Because the enemy squadron had already been activated, Wedge had 6 dice. Three of them were hits - enough to destroy Saber Squadron within one activation. However, Wedge had to face Bossk's retaliation, which resulted in Wedge losing 1 hull point. Both can be seen on the following pictures (click to enlarge):


"Ghost, this is the Falcon! Behind me the third star destroyer has appeared out of Hyperspace!"
Han started hastily a turn.
"We have seen it. It flies directly into the side of our hammerhead formation!", Hera responded. Han saw the catastrophe. The star destroyer could target the hammerheads in point blank range from his front firing arc.
In addition even more squadrons appeared...and close to the Nebula Gate another Arquittens light cruiser left hyperspace. With even more squadrons!
"That is too much. We can not deal with that fire power! All units, prepare for retreat!", Han heared Hera's voice saying.
"We won't get another chance for this", Han responded with gritted teeth, "we got to give our reinforcments more time."
But then, with a loud boom four ships came out of hyperspce. A comms channel opened up: "This is Admiral Raddus of the Rebel Alliance. All units report in!"
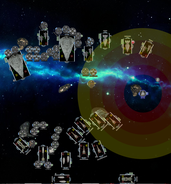
After Visovics deployed the Avenger right in the side of my hammerheads and another Arquittens offside, it was my turn to bring in my reinforcements. I decided to deploy all of them at once. Defiance, Home One (which's belly festered with 4 B-Wing squadrons due to Rapid Launch Bays), and Endeavor I deployed in the rear of the enemy fleet. Liberty and 2 B-Wings left next to the Quasar hyperspace in order to take the carrier immediatelly out of the game. The following image presents the state of the game right after reinforcements had been deployed at the beginning of round 2 (click to enlarge):

In one of my next articles you will be able to read, how the battle went on. Stay tuned!
To be continued...
Kommentar schreiben